
Set up the Global Log Receiver
Overview
This guide provides instructions for setting up an F5 Distributed Cloud Global Log Receiver so that you can send your tenant logs to an external log collection system.
About the F5 Distributed Cloud Global Log Receiver
The Global Log Receiver supports sending the request (access) logs, security events, DNS, and audit logs for all HTTP load balancers and sites. It also supports access logs from many different sources (like proxies). The access logs field vh_type can be one of the following:
VIRTUAL_SERVICEHTTP_LOAD_BALANCERAPI_GATEWAYTCP_LOADBALANCERPROXYLOCAL_K8S_API_GATEWAYCDN_LOADBALANCER
The logs are sampled and do not contain the body of the request or response logs.
The Global Log Receiver page displays the following information:
- Name: The name of the Global Log Receiver.
- Namespace: The namespace in which the Global Log Receiver is created.
- Status: The logging status of the Global Log Receiver. The status displays one of the following values:
| Status | Description |
|---|---|
| Up | The Global Log Receiver is functioning as expected. |
| Down | Logging is not operational due to unreachable upstream endpoint, Global Log Receiver service outage, configuration issues, or logs not sent. |
| Unknown | Status detection for the Global Log Receiver failed. |
The external log collection system creates a folder for each day and within that daily folder, also creates a subfolder for each hour. Every five minutes, the log collection system writes new logs to the relevant hourly subfolder as compressed gzip files. The supported log format is NDJSON (newline-delimited JSON), where each line represents a separate JSON object.
The Global Log Receiver is namespace-scoped. If it's created under the Shared Configuration workspace, it lands in the shared namespace. There is no visibility into other namespace logs. If it's created under the Multi-Cloud Network Connect workspace, it lands in the system namespace. There is visibility into all namespaces.
If you're using the shared namespace, you can send logs from either the shared namespace or all namespaces, or a specific list of namespaces. If you are using the system namespace, you can only send logs from the system namespace.
A mismatch between the Global Log Receiver's namespace and where customer traffic actually flows silently drops logs.
If you want logs from all namespaces, create an object in the shared namespace with all namespaces as a namespace filter.
Supported log collection systems
The Global Log Receiver supports sending the logs for the following log collection systems:
- AWS CloudWatch
- AWS S3
- Azure Blob Storage
- Azure Event Hubs
- Datadog
- GCP Bucket
- Generic HTTP or HTTPS server
- IBM QRadar
- Kafka
- New Relic
- Splunk
- Sumo Logic
Important: To use Azure Event Hubs, you must have a standard, premium, or dedicated tier subscription. For more information, refer to How do I configure Global Log Receiver for Azure Event Hubs?.
Quotas and enforcement
Quotas limit the total number of Global Log Receiver objects a tenant can have configured and active at one time. Deleting or recreating a Global Log Receiver doesn't consume additional quota. When you delete a Global Log Receiver, its quota slot becomes available for a new object.
To look up your quota, see Default Quota Reference. To request a quota increase, contact F5 support.
Before you begin
Before you begin, you must have:
-
An F5 Distributed Cloud account. If you don't have an account, see Get Started with Distributed Cloud Console.
-
The required workspace permissions to create, delete, or modify objects.
-
An external log collection system reachable publicly.
-
A firewall or proxy server configured to allow connections to and from the IP addresses listed in the Public IPv4 Address Ranges for F5 Global Log Receiver section.
Create Global Log Receiver
You can create the global log receiver in the system namespace (Multi-Cloud Network Connect workspace) or in the shared namespace (Shared Configuration workspace).
Step 1: Create a global log receiver object.
-
From the Console home page, select the Multi-Cloud Network Connect workspace or the Shared Configuration workspace.
-
In the Multi-Cloud Network Connect workspace, select Manage > Log Management > Global Log Receiver.
-
In the Shared Configuration workspace, select Manage > Global Log Receiver.
-
Select Add Global Log Receiver.
Step 2: Configure global log receiver properties.
-
Enter a name in the Metadata section. Optionally, set labels and add a description.
-
From the Log Type list, select Request Logs, Security Events, Audit Logs, or DNS Request Logs. Request Logs are the default.
-
For the Multi-Cloud Network Connect workspace, select logs from the current namespace from the Log Message Selection list. This is the default option.
-
For the Shared Configuration workspace, you can select one of the following options from the Log Message Selection list:
-
Select logs from current namespace: This option sends logs from the shared namespace.
Note: For DNS Request Logs, the system doesn't support sending logs from the current namespace.
-
Select logs from all namespaces: This option sends logs from all namespaces.
-
Select logs in specific namespaces: This option sends logs from specified namespaces. Enter the namespace name in the displayed namespaces list. Use Add Item to add more than one namespace.
-
-
From the Receiver Configuration list, select a receiver and follow the corresponding instructions below.
AWS CloudWatch Receiver
-
Enter the group name for the target CloudWatch logs stream in the Group Name box.
-
Enter the stream name for the target CloudWatch logs stream in the Stream Name box.
-
From the AWS Cloud Credentials list, select a cloud credentials object. You can also use Add Item to create a new object. For instructions on creating cloud credentials, see Cloud Credentials.
-
Select a region from the AWS Region list. Make sure that you select the same region in which the S3 storage is configured.
AWS S3 Receiver
-
Enter your AWS S3 bucket name in the S3 Bucket Name box.
-
From the AWS Cloud Credentials list, select a cloud credentials object. You can also use Add Item to create a new object. For instructions on creating cloud credentials, see Cloud Credentials.
-
Select a region from the AWS Region list. Make sure that you select the same region in which the S3 storage is configured.
-
Confirm you've set up AWS AssumeRole Authentication. See Global Log Receiver (GLR) configuration with AWS AssumeRole Authentication.
Azure Blob Storage
-
Select Configure to set up the Azure Blob storage connection string.
-
Select Blindfolded Secret from the Secret Type list.
-
Use the Action list to select:
-
Blindfold New Secret: Select Built-in from the Policy Type list and enter your connection string into the Secret to Blindfold box, or select Custom for the policy type and then select a custom policy and enter your connection string.
-
Use Existing Blindfolded Secret: Enter your connection string into the Blindfolded Secret box.
-
-
To get the Azure Blob connection string:
- Go to All Services > Storage accounts > (name of account).
- Select Access Keys on the navigation list for the storage account you have selected.
- In the Access Keys pane, select one of the access keys and select Show for the Connection String. Select Copy to Clipboard on the left side of the shown box.
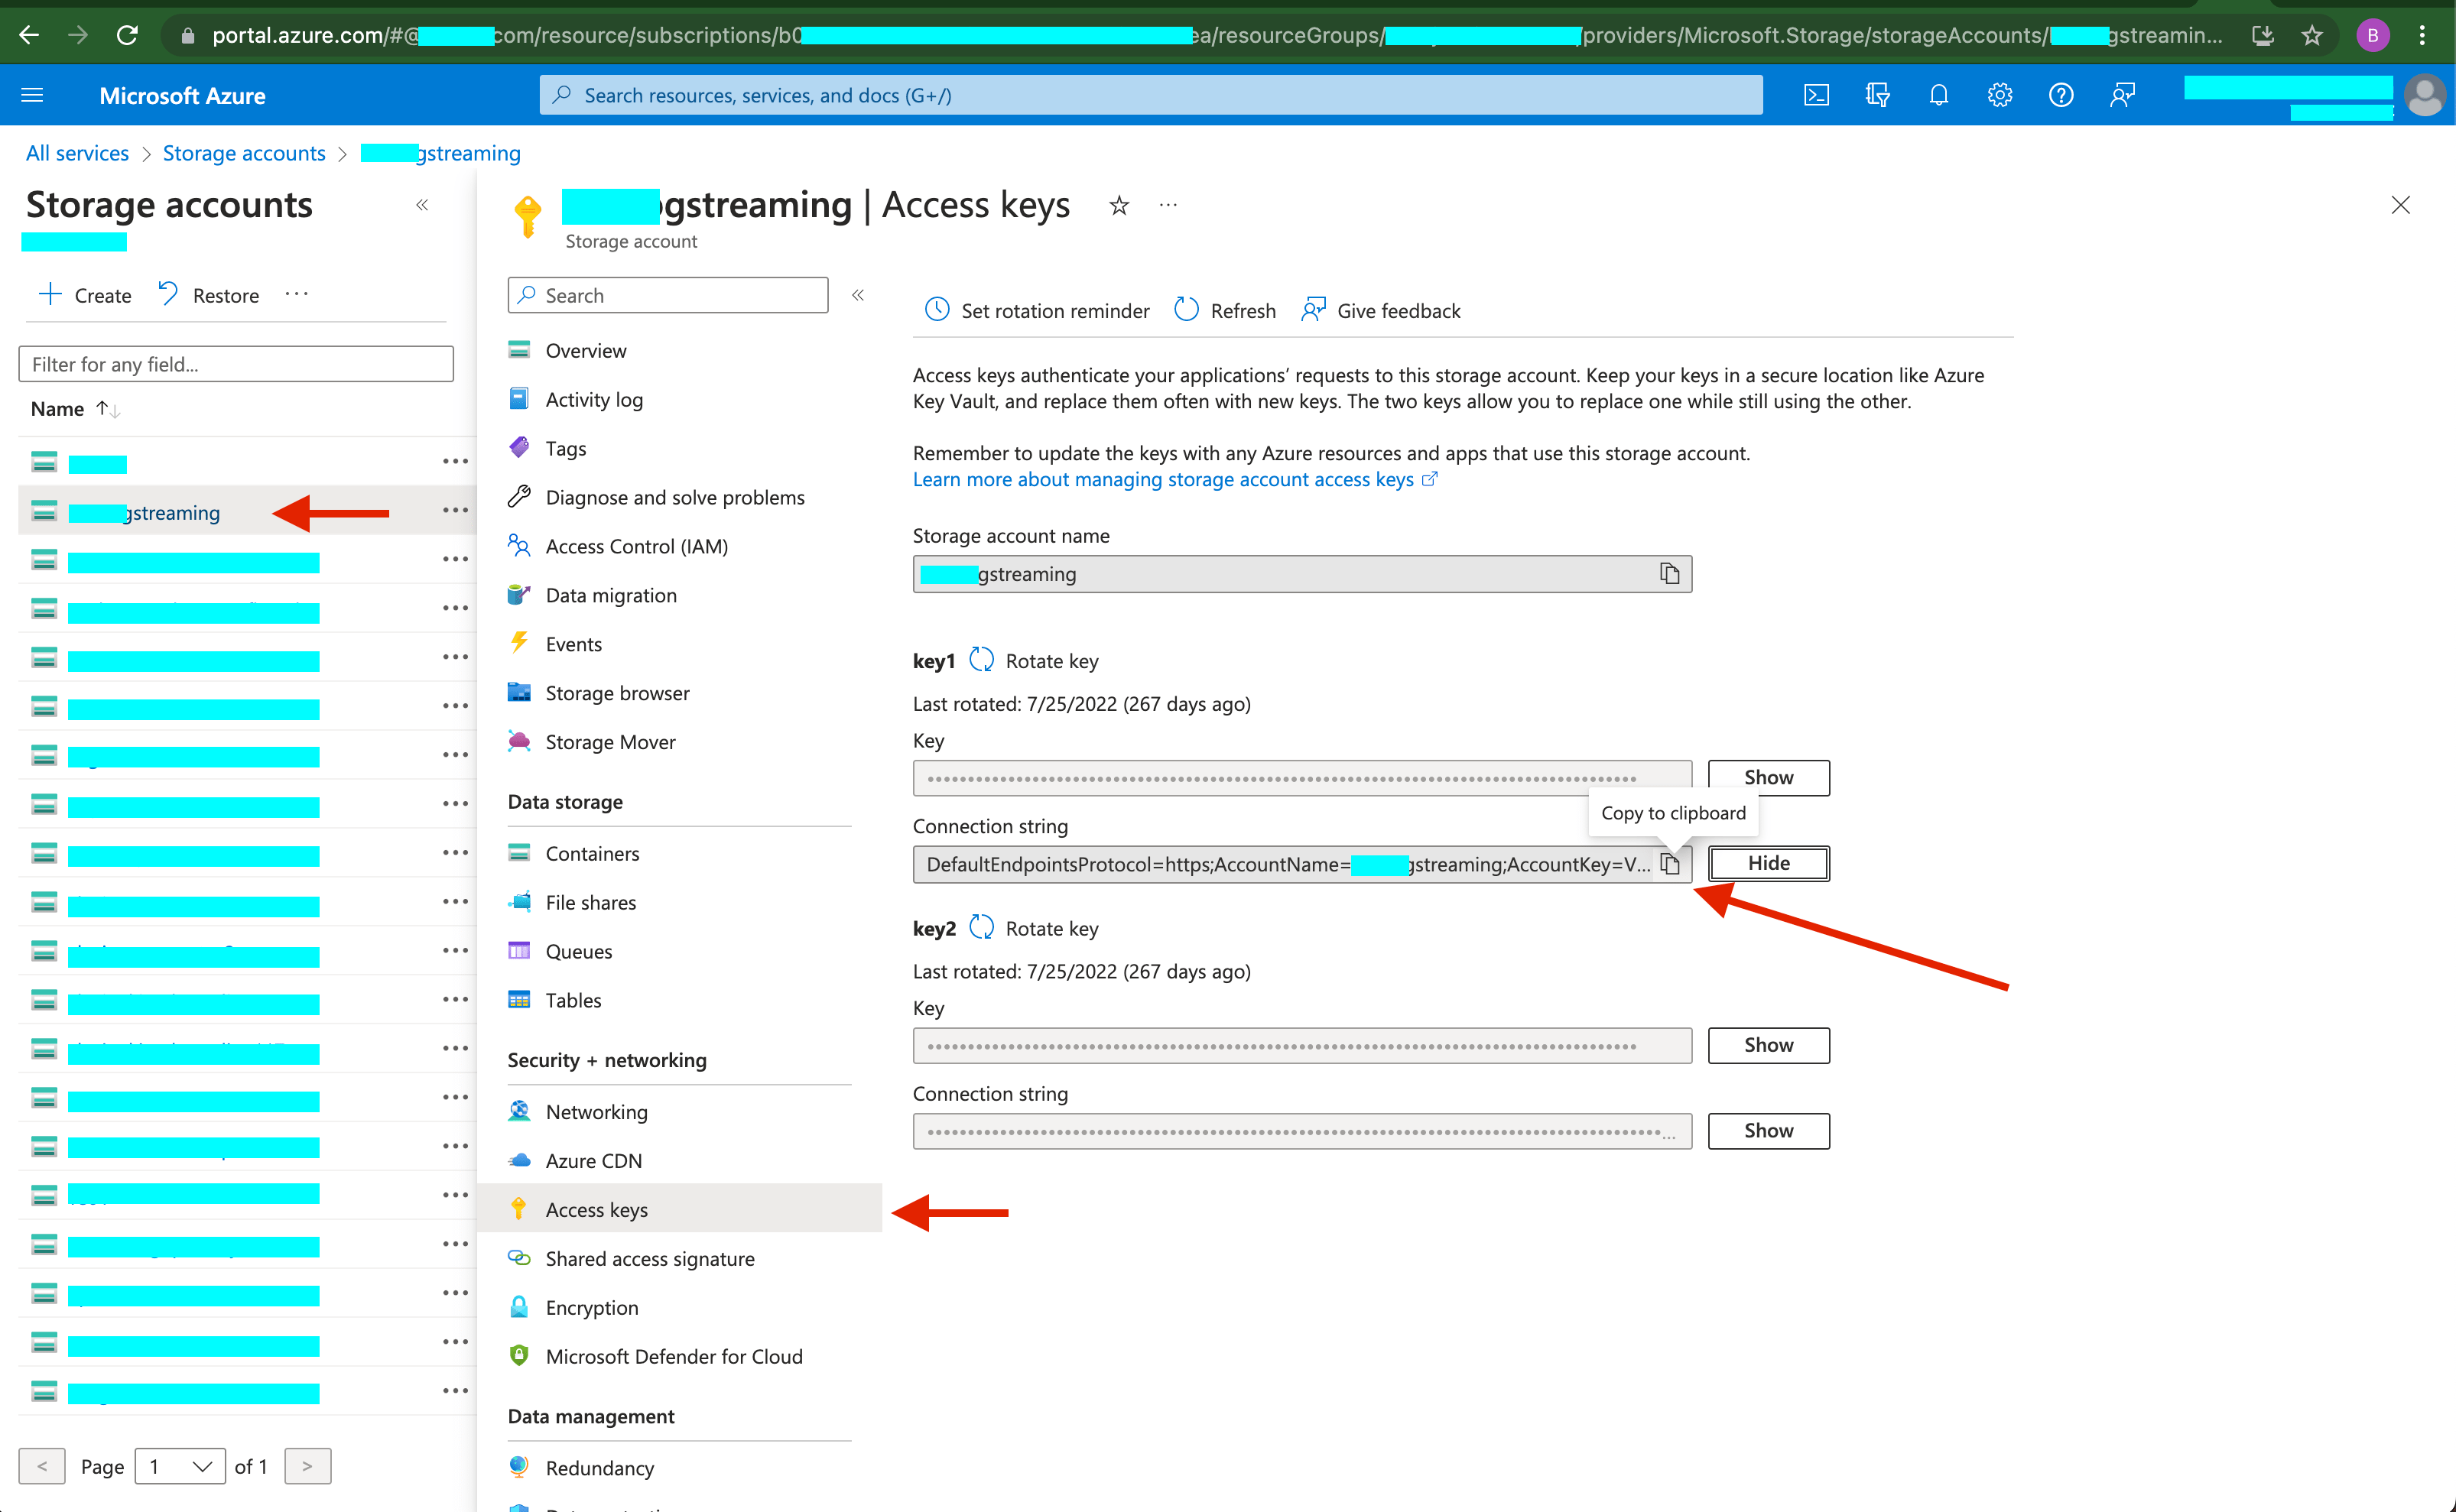
Figure: Azure Blob Connection String Location
-
Select Apply.
-
In the Container Name box, enter the name of the Azure container into which the logs are sent.
Azure Event Hubs
-
Select Configure to set up the Azure Event Hubs storage connection string.
-
Select Blindfolded Secret from the Secret Type list. Your connection string looks like
EntityPath=<EventHubName>. -
Use the Action list to select:
-
Blindfold New Secret: Select Built-in from the Policy Type list and enter your connection string into the Secret to Blindfold box, or select Custom for the policy type and then select a custom policy and enter your connection string.
-
Use Existing Blindfolded Secret: Enter your connection string into the Blindfolded Secret box.
-
-
To retrieve the Azure Event Hubs connection string, refer to the Get an Azure Event Hubs connection string article.
-
Select Apply.
-
In the Event Hubs Namespace box, enter the namespace of the Azure instance that stores the logs.
-
In the Event Hubs Instance box, enter the name of the Azure instance that stores the logs.
Datadog Receiver
-
Enter the URL for Datadog into the Datadog Site box (
datadoghq.com). -
Select Configure to set up the Datadog API key.
-
Select Blindfolded Secret from the Secret Type list.
-
Use the Action list to select:
-
Use Existing Blindfolded Secret: Enter your Datadog API Key into the Blindfolded Secret box.
-
Blindfold New Secret: Select Built-in from the Policy Type list and enter your Datadog API key into the Secret to Blindfold box, or select Custom for the policy type and then select a custom policy and enter your Datadog API key.
-
-
To get the Datadog API key:
- Go to API Keys. For Datadog documentation, see API App Keys.
- Create an API key or select an existing one. A pop-up window appears.
- Select Copy from the pop-up window and paste this value into the Global Log Receiver configuration for the API key.
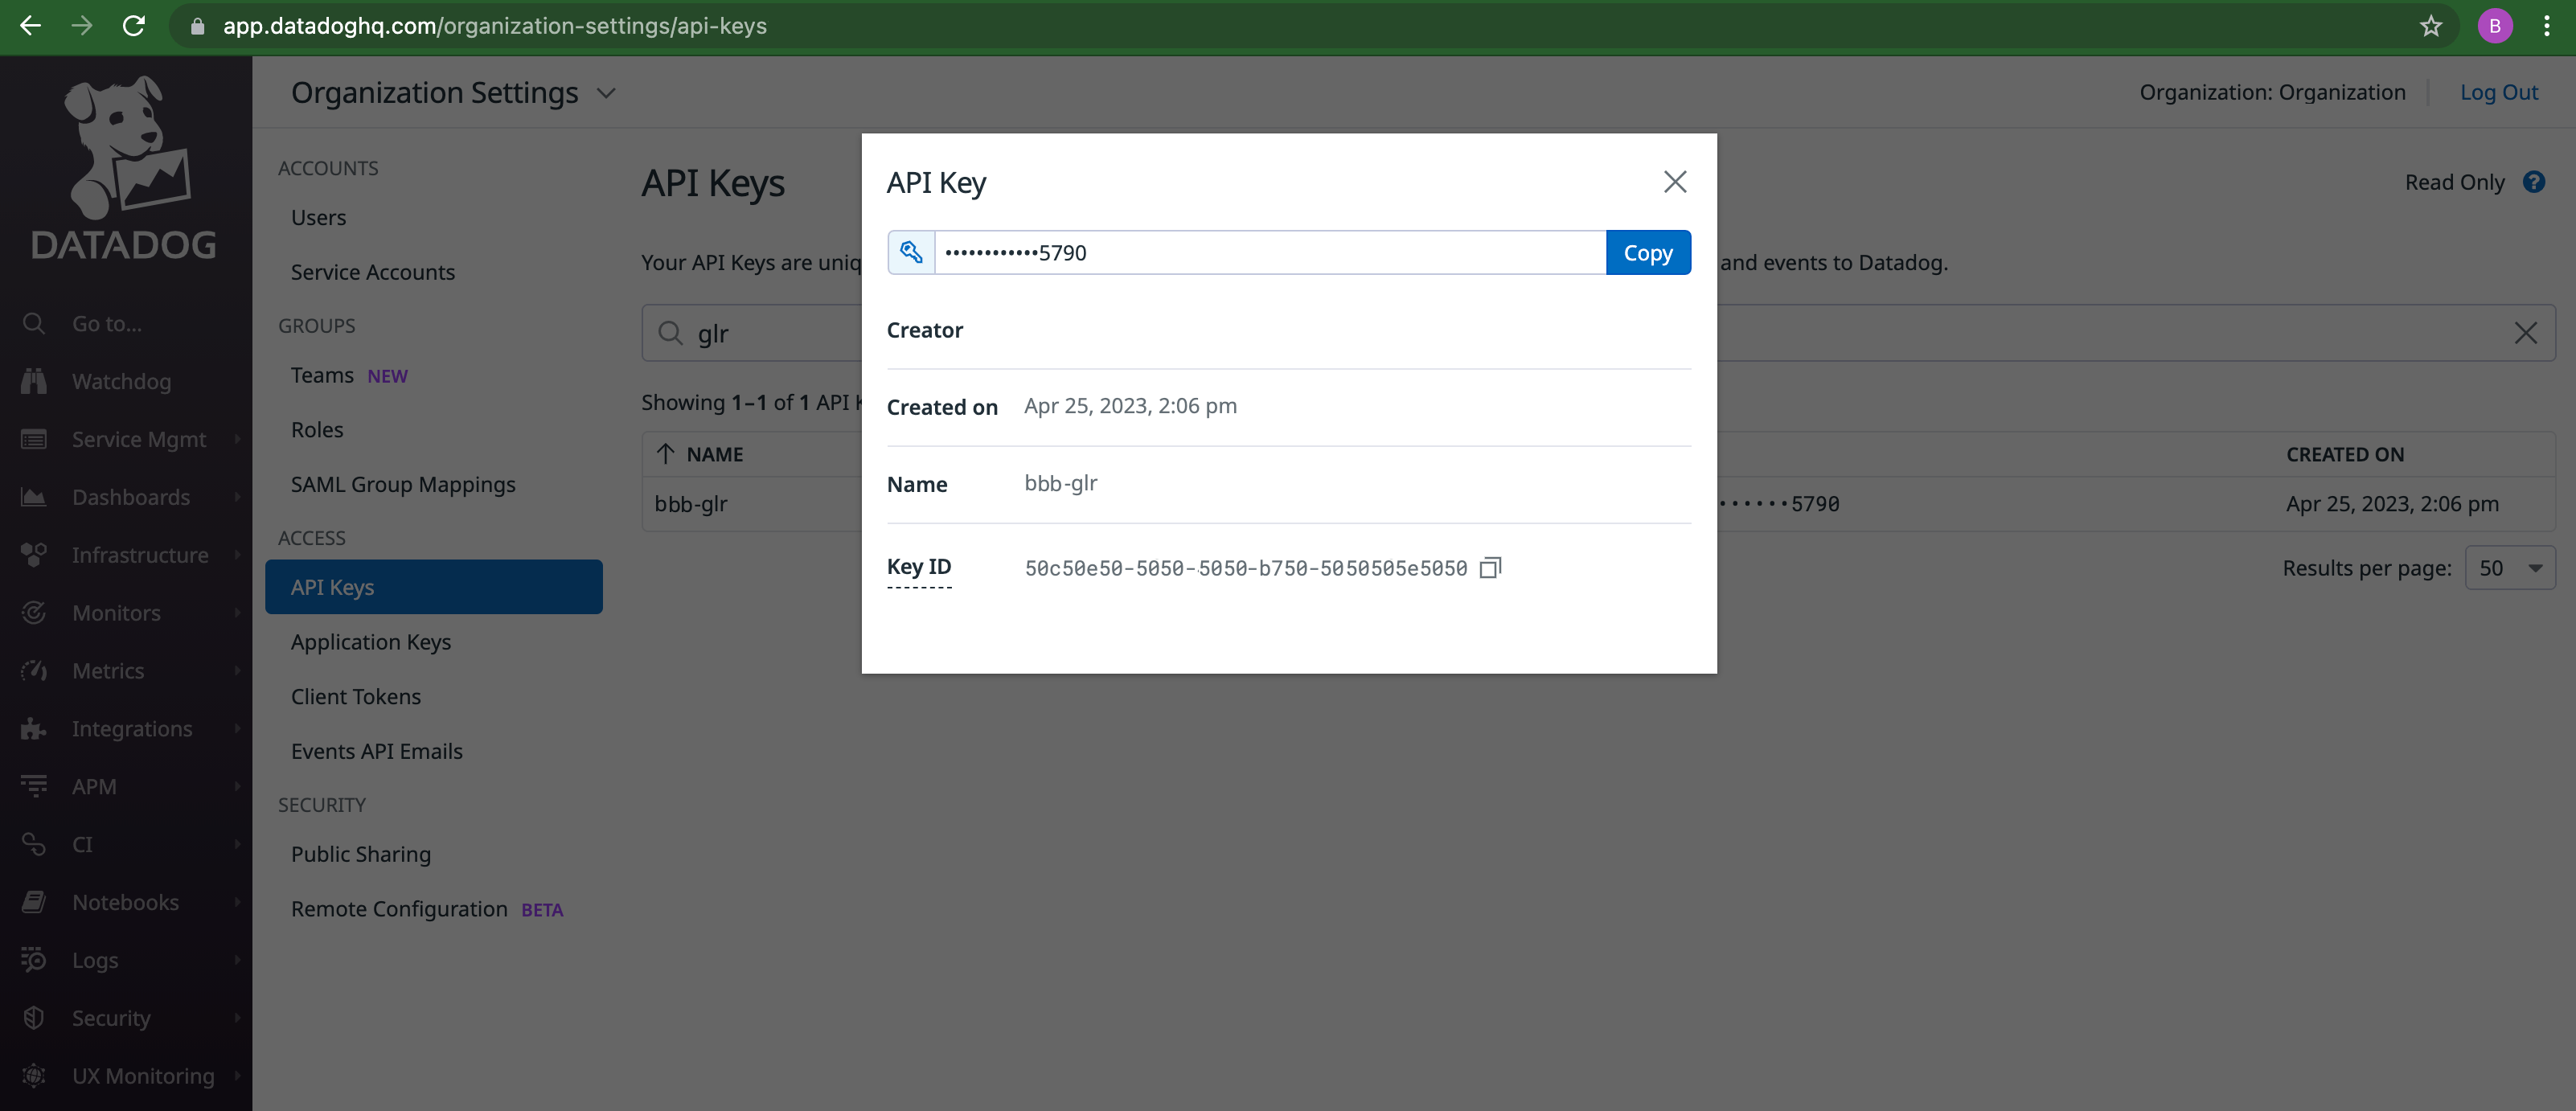
Figure: Datadog API Key Location
- Select Apply.
GCP Bucket Receiver
-
In the GCP Bucket Name box, enter the name of the bucket into which the logs are sent.
-
Use the GCP Cloud Credentials list to select an existing set of credentials. Alternatively, select Add Item to create new credentials. For help creating new credentials, see Cloud Credentials.
HTTP Receiver
-
Enter the URI for your HTTP receiver in the HTTP Uri box.
-
Select an authentication type from the Authentication list:
- None: No authentication performed.
- Basic Authentication: Enter your username in the User Name box and select Configure to enter your password.
- Token Authentication: Select Configure to enter your authentication token.
IBM QRadar Receiver
Enter the URI for your QRadar receiver in the Log Source Collector URL box. For more information, refer to the HTTP Receiver protocol configuration options IBM article.
Sometimes, the Global Log Receiver receives multiple events at once. Configure the QRadar receiver to split the events into multiple records. To do this, configure the Message Pattern box as follows:
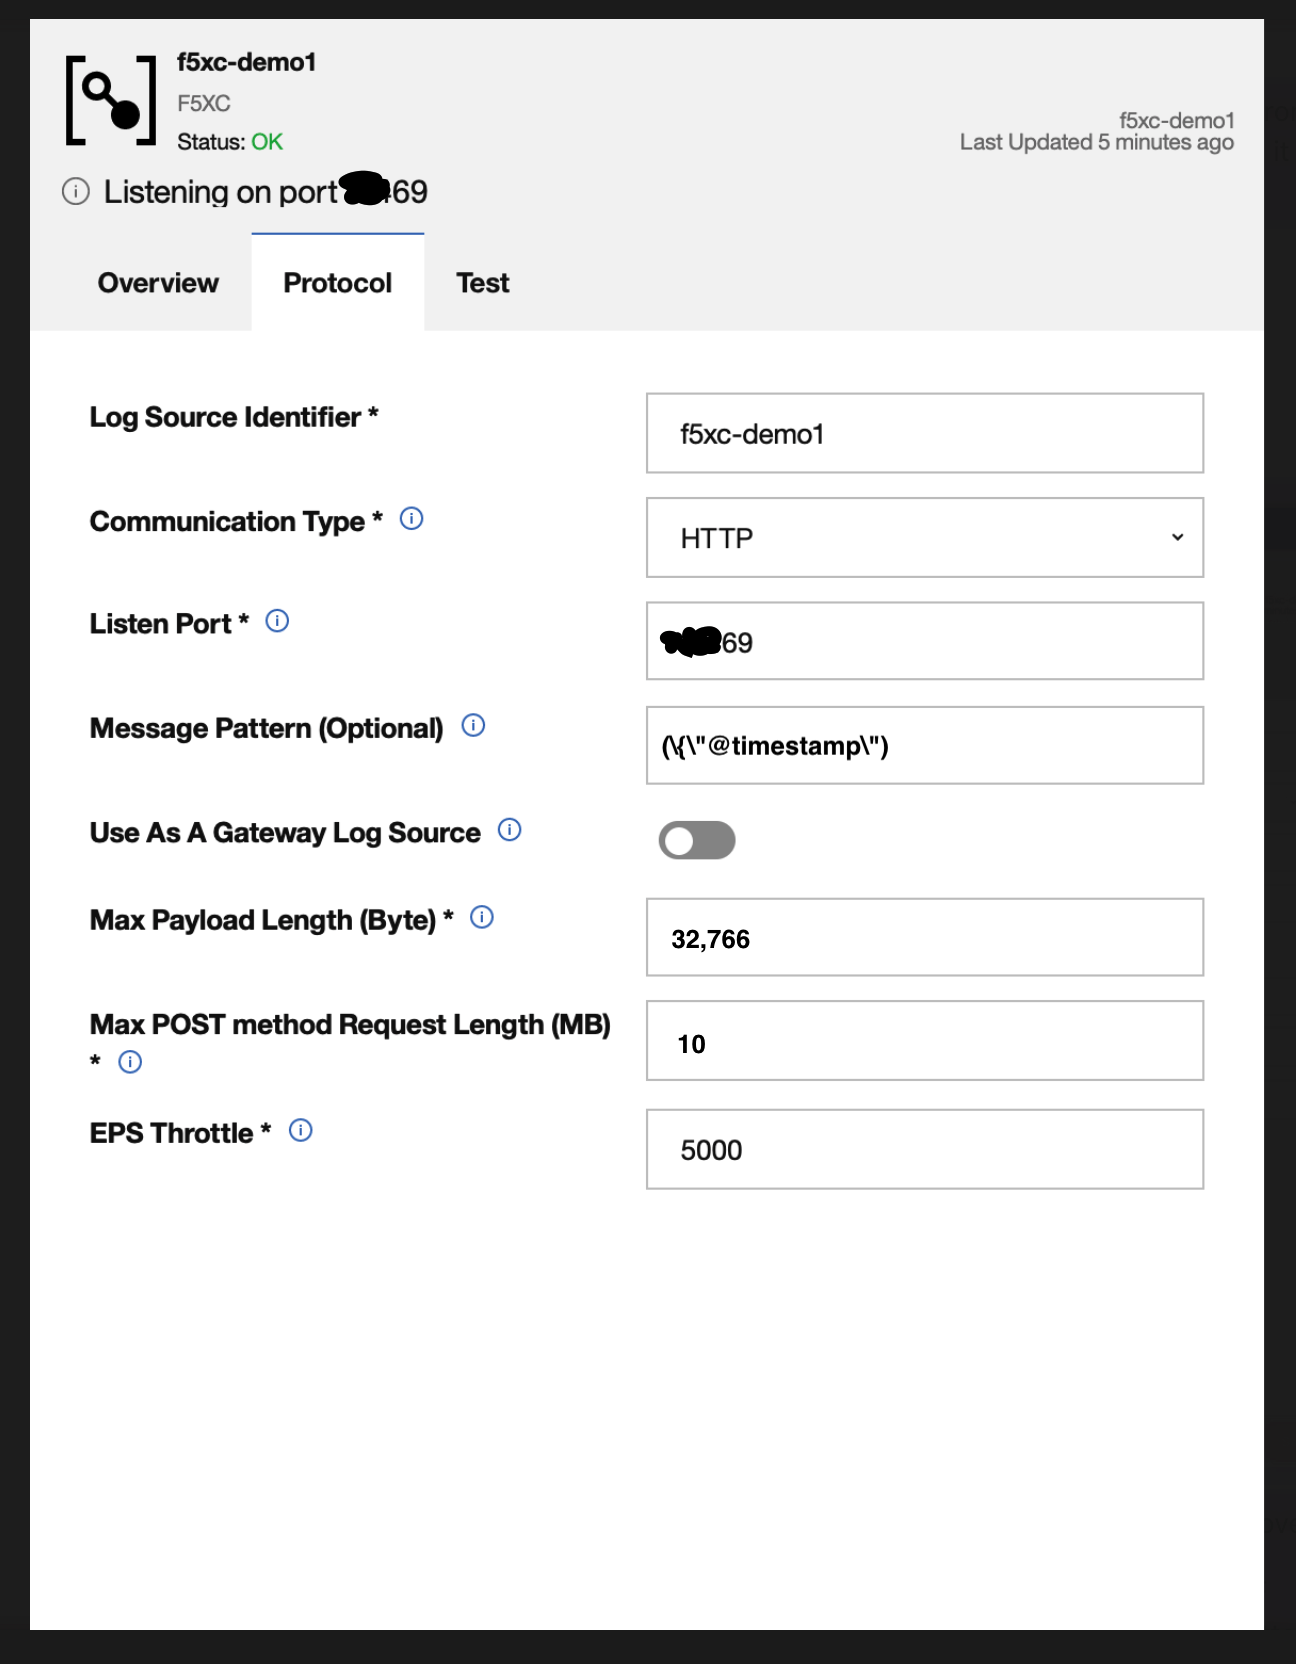
Figure: QRadar Message Pattern Configuration
Kafka Receiver
-
In Kafka Bootstrap Server List, enter the bootstrap server as
host:port. Use Add Item to add more pairs. -
Enter the Kafka Topic name for the reported events.
New Relic Receiver
-
Select the endpoint that is applicable to your New Relic account from the NewRelic Account Endpoint list.
-
Select Configure to set up the New Relic license key.
-
Select Blindfolded Secret from the Secret Type list.
-
Use the Action list to select:
-
Use Existing Blindfolded Secret: Enter your New Relic license key into the Blindfolded Secret box.
-
Blindfold New Secret: Select Built-in from the Policy Type list and enter your New Relic license key into the Secret to Blindfold box, or select Custom for the policy type and then select a custom policy and enter your New Relic license key.
-
-
Select Apply.
Splunk Receiver
According to a Splunk article, there are two different Splunk HEC URIs:
-
For Splunk Cloud customers, the standard HEC URI is
https://http-inputs-customer_stack.splunkcloud.com. Splunk Cloud customers do not need to specify port 8088. All HEC traffic goes over port 443. -
For customers using AWS Firehose, you have a second HEC URL:
https://http-inputs-firehose-customer_stack.splunkcloud.com. -
For customers running HEC on their own deployments or using the Splunk test drive instance, you need to specify port 8088:
https://input-prd-uniqueid.cloud.splunk.com:8088.
In either of the scenarios, you can use the following commands to validate the URLs:
-
For Splunk Cloud, enter
nslookup http-inputs-<customer_stack>.splunkcloud.com. -
For Splunk Test Drive, enter
nslookup input-prd-uniqueid.cloud.splunk.com.
See Splunk documentation.
-
Enter the Splunk HEC Logs Endpoint.
-
Select Configure to set up the Splunk HEC token.
-
Select Blindfolded Secret from the Secret Type list.
-
Use the Action list to select:
-
Use Existing Blindfolded Secret: Enter your Splunk HEC token into the Blindfolded Secret box.
-
Blindfold New Secret: Select Built-in from the Policy Type list and enter your Splunk HEC token into the Secret to Blindfold box, or select Custom for the policy type and then select a custom policy and enter your Splunk HEC token.
-
-
Select Apply.
Sumo Logic Receiver
-
Select Configure to set up the HTTP Source Address URL.
-
Select Blindfolded Secret from the Secret Type list.
-
Use the Action list to select:
-
Use Existing Blindfolded Secret: Enter your Sumo Logic HTTP collector URL into the Blindfolded Secret box.
-
Blindfold New Secret: Select Built-in from the Policy Type list and enter your Sumo Logic HTTP collector URL into the Secret to Blindfold box, or select Custom for the policy type and then select a custom policy and enter your Sumo Logic HTTP collector URL.
-
-
Select Apply.
Step 3: Optionally, configure advanced settings.
Advanced settings include configuring batch options and TLS.
Step 3.1: Configure batch settings.
Using batch options, you can apply limits, such as the maximum number of messages bytes or batch timeout age for a batch of logs that is sent to the receiver.
The default Batch Options are:
- Timeout Seconds: 300s (5 minutes)
- Max Events: (no limit/unset)
- Max Bytes: 10 MB
To modify the default configurations, select the Show Advanced Fields toggle on and do the following in the Batch Options section:
-
From the Batch Timeout Options list, select Timeout Seconds and enter a timeout value in the Timeout Seconds box.
-
From the Batch Max Events list, select Max Events and enter a value between 32 and 2000 in the Max Events box.
-
From the Batch Bytes list, select Max Bytes and enter a value between 4096 and 1048576 in the Max Bytes box. The logs are sent after the batch reaches the specified size.
Step 3.2: Configure TLS settings.
-
Select Use TLS for the TLS list.
-
Select Server CA Certificates from the Trusted CA list. Enter the certificates in PEM or Base64 format in the Server CA Certificates box.
-
Select Enable mTLS from the mTLS config list and enter the client certificate in PEM or Base64 format in the Client Certificate box.
-
Select Configure in the Client Private Key box, and enter the secret in the box with the Secret Type selected as Clear Secret.
-
Select Apply. Wait for the operation to complete and select Apply.
-
Step 4: Save Global Log Receiver object.
Select Add Global Log Receiver to save.
Delete Global Log Receiver
When you delete a Global Log Receiver using F5 Distributed Cloud Console, the configuration object is removed. Although the configuration object is removed synchronously, the underlying log forwarding infrastructure propagation is asynchronous. As a result, logs might continue to flow to the previously configured destination for a short period until deletion fully propagates across the log forwarding infrastructure.
-
From the F5 Distributed Cloud Console home page, select the Multi-Cloud Network Connect workspace or the Shared Configuration workspace.
-
In the Multi-Cloud Network Connect workspace, select Manage > Log Management > Global Log Receiver.
-
In the Shared Configuration workspace, select Manage > Global Log Receiver.
-
For your Global Log Receiver object, select ... > Delete.
-
In the confirmaton dialog, select Delete.
Modify Global Log Receiver
Important: F5 recommends that you create a new Global Log Receiver instead of modifying an existing one. If you need a different configuration, make sure you create a new object and then delete the existing one.
Important behavior if you modify a Global Log Receiver:
-
Configuration changes can take a short time to propagate across the log forwarding infrastructure.
-
When you change the log stream filters or update the target destination sink, unconsumed logs remaining in the processing queue before you made the change continue to be delivered to the newly configured destination. An example includes switching from
audit_logstodns_logs. -
The log forwarding infrastructure streams buffered logs from the processing queue without retroactively re-filtering historical messages against newly updated filters.
Tip: To keep the streams separate and prevent historical or queued logs from a previous filter configuration from being sent to a new destination, F5 recommends that you delete the existing Global Log Receiver object and create a new object whenever you change:
- Log stream filters (for example, audit logs versus DNS logs versus request logs)
- Destination endpoints or storage containers
To modify:
-
For the Multi-Cloud Network Connect workspace, go to Manage > Log Management. For your object, select ... > Manage Configuration > Edit Configuration. Make the changes and then select Save Global Log Receiver.
-
For the Shared Configuration workspace, go to Manage > Global Log Receiver. For your object, select ... > Manage Configuration > Edit Configuration. Make the changes and then select Save Global Log Receiver.
Tip: To troubleshoot issues, see K000147939: Global Log Receiver (GLR) Troubleshooting Tips.
References
For more information, see: